Make Over on Rocking Horse
so i found this rocking horse on the side of the road on garbage day so i picked it up...
things your going to need to make it (lucky for me i had all the stuff besides the wood bar to but the gold knobs on.
primer
paint (i had blue Walmart brand of paint) $9
little bottles of paint (i already had pink and white) $2each
1 yard of pink ribbon for bow on neck
1 yard blue ribbon for hair
1 yard of white ribbon for bow on tail
1 yard white cording for the face
1/4 pink lace for the front
6oz yarn for mane and tail(i already had yarn so i mixed them (i had white and pink simply soft yarn and i had a pink push yarn) or (feather boa you can get one at dollar store picture on the bottom)
staple gun
optional knobs (my horse handles where broken so that's why i did knobs)
black sharpie
2 foam brush $1 each
paint brushes
wood stick at craft store$1
wood Glue
2 small screws
hot glue gun
rocking horse (you can get this one at Michael's craft store $30)
- so first clean off horse, then prime with foam brush, let dry for 2 hours
- then coat with paint with second foam brush, i did two coats because the paint i had was really thin.
- after its dry you paint patterns on your horse (you can get really creative) i did swirls and hearts on mine. and i used a cotton ball for the cheeks and a black sharpie for the eyes.
- while its drying your going to take your yarn and wrap it around a big notebook going the long way. after you wrap all your yarn your going to cut the bottom part of the yarn (on the bottom of the notebook making sure your have a hold on the middle of the yarn, top of notebook.)
- then your going to separate the yarn in half. one for the tail and the other for the mane.
- for the mane your going to separate it into 5 different piles. and your going to tie a knot with extra yarn on each one in the middle.
- Tail: after you tie it off in the middle fold it in half and tie it a piece of yarn around it, like the picture below.
- okay now with your staple gun your going to staple the bubble part to the horse.
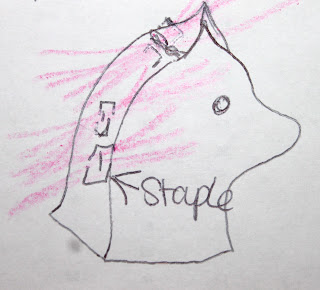
- Mane: your going to staple each pile down the back of the head. (the yarn should be going the long way
(Sorry for the pictures i didn't really take my time to draw them)
(back of head)
- and then i staples the blue ribbon just in random spots on the mane. and then a braided some of the yarn .
- okay so now for the handles since mine didn't have handles, i did knobs for mine but if you have handles i wouldn't take them off because it was a pain in the butt to get them on.
- Handles: so with your stick your going to saw two pieces that our 1/2 inch long and drill a hole Right in the middle of them. then your going to take your knob and screw in to the wood.
- after that your going to use wood glue and glue them in to the hole. (its a pain in the put because you have to sit there and hold it tell its dry enough so it doesn't fall out.)
- Decor: so i took two small screws and screwed them next to the cheeks, and with white cording, wrap one going around the nose and the other one around the neck. and then i hot glued it behind the nose and behind the neck so it wouldn't move.
- with the pink ribbon i just tied it around the neck and the white ribbon around the tail (i stapled the white ribbon so if it came undone i wouldn't loose it.)
- and i hot glued pink lace in the front
And now you have adorable rocking horse!
Found this online using a Boa for the main and tail.
how to use Ribbon for the mane and mod podge horse


Awesome. I got a rocking horse for my little girl from a garage sale this past weekend which I'm going to repaint and fix up. I want to replace the mane with something nicer (the existing mane is kinda gross). Your instructions are useful - it hadn't occurred to me to do something like that. So - thanks!
ReplyDeleteCheers.